
3D floor plan design play a great role in converting online visitors into prospective buyers. These are well-scaled 2D floor plan designs or 3D floor plan designs that show the top view of the property so that viewers can identify the room spacing and plot management plan with ease. Planning a home renovation, building your dream house, or redesigning your commercial space? Understanding 3D floor plan design can transform your vision into reality with stunning clarity and precision.
Unlike traditional 2D blueprints, 3D floor plan design brings your space to life before construction even begins. This comprehensive guide walks you through everything you need to know about creating professional 3D floor plans that capture your vision perfectly.
Table of Contents
Understanding 3D Floor Plan Design Principles
In short, the floor plans help to communicate the actual flow of the property. 3D floor plan design is the art and science of creating three-dimensional representations of interior spaces. These digital models show rooms, walls, furniture, and fixtures in a realistic, easy-to-understand format.
What makes 3D floor plans different from traditional blueprints?
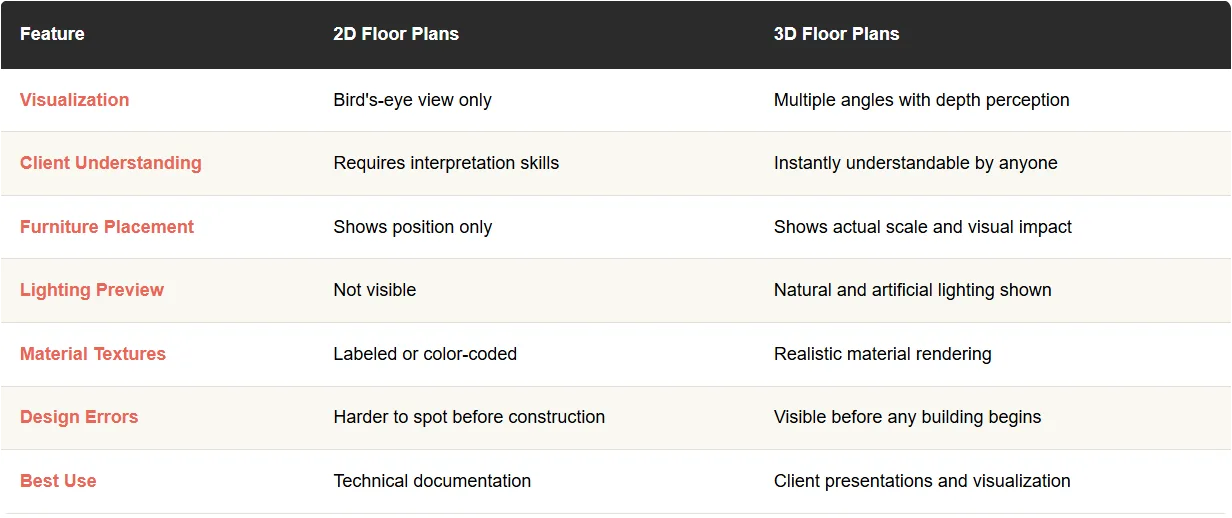
While 2D floor plans show a bird’s-eye view with basic measurements, 3D floor design adds depth, perspective, and visual context. You can see how furniture fits, how natural light flows through windows, and how different rooms connect.
Core Design Principles
Every successful 3D layout design follows these fundamental principles:
Proportion and Scale
- All elements must maintain realistic dimensions
- Furniture should fit comfortably within room boundaries
- Doorways and hallways need appropriate clearance
- Windows and fixtures should match standard building codes
Spatial Flow
- Rooms should connect logically for daily movement
- High-traffic areas require adequate circulation space
- Private zones should separate from public entertaining areas
- Emergency exits must remain unobstructed
Functionality First
- Each space serves a clear purpose
- Room layouts support intended activities
- Storage solutions integrate seamlessly
- Utility access points remain accessible
Visual Balance
- Furniture arrangement creates harmony
- Architectural features anchor the design
- Negative space prevents cramped feelings
- Focal points draw attention strategically
A skilled 3D floor plan designer understands how these principles work together to create spaces that look beautiful and function perfectly.
Also, Read: Difference Between 2D Floor Plans and 3D Floor Plans (2D vs 3D Plans)
The Design Process: Step-by-Step Workflow
From the past few years, the idea to evaluate property from floor plans is on the boost due to the advanced 3D design arrangements. Creating professional 3D floor plans follows a systematic approach. Whether you’re working with a floor plan design maker or designing independently, this workflow ensures comprehensive results.
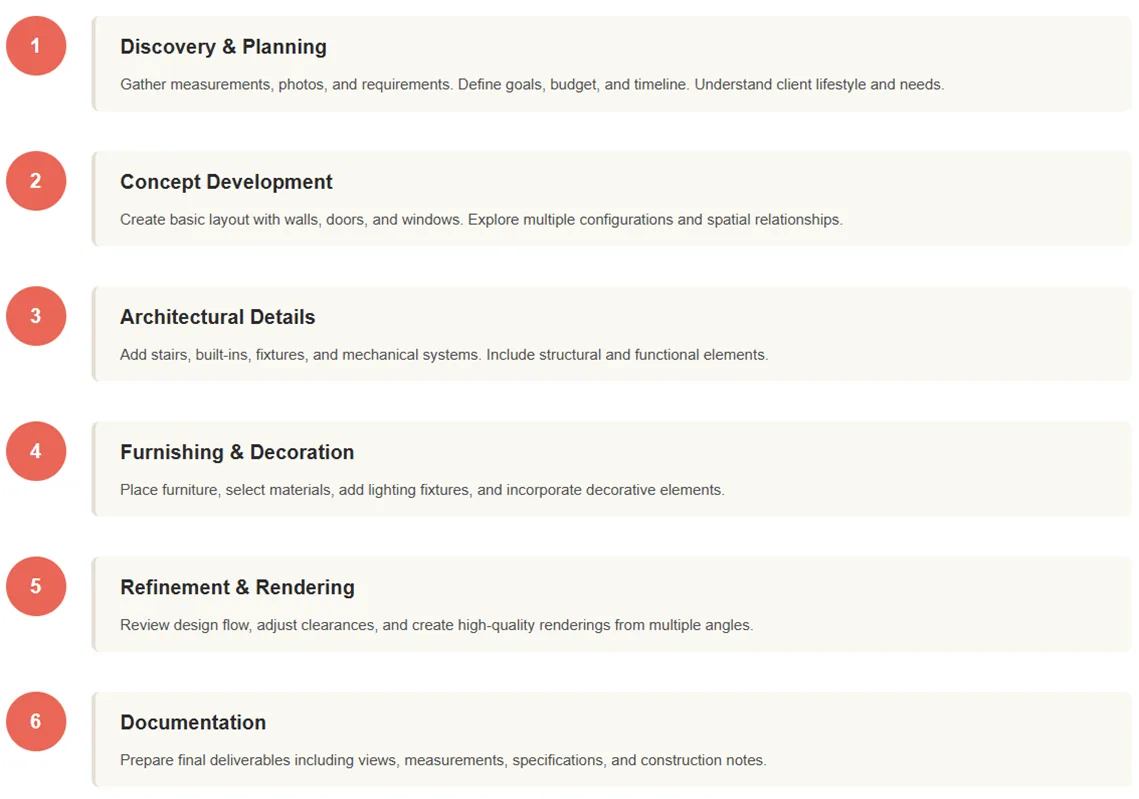
Phase 1: Discovery and Planning
Start by gathering essential information:
- Exact measurements of the space (length, width, ceiling height)
- Door and window locations with dimensions
- Structural elements like columns, beams, or load-bearing walls
- Existing electrical outlets and plumbing fixtures
- Building codes and restrictions for your area
Define your design goals:
What do you want to achieve? More natural light? Better traffic flow? Increased storage? A modern aesthetic? Clear objectives guide every design decision.
Phase 2: Initial Concept Development
Create your basic layout:
Begin with walls, doors, and windows. This skeletal framework establishes room boundaries and connections. Don’t worry about details yet—focus on getting the overall spatial relationships right.
Consider multiple configurations:
Try different arrangements before committing. Move walls, relocate doors, experiment with open-concept versus defined rooms. This exploration phase often reveals surprising possibilities.
Phase 3: Adding Architectural Details
Incorporate structural elements:
- Stairs and railings
- Built-in cabinetry and shelving
- Fireplaces and chimneys
- Ceiling features like tray ceilings or beams
- Trim, molding, and baseboards
Include mechanical systems:
Mark locations for HVAC vents, light fixtures, outlets, and switches. These practical considerations prevent costly changes during construction.
Phase 4: Furnishing and Decoration
Select and place furniture:
A 3D floor plan designer knows furniture placement dramatically impacts how a space feels. Start with large pieces first—beds, sofas, dining tables. Then add complementary pieces.
Add finishing touches:
- Area rugs that define zones
- Window treatments for privacy and style
- Artwork and decorative accessories
- Plants that bring life to the space
- Lighting fixtures that enhance ambiance
Phase 5: Refinement and Rendering
Review and adjust:
Walk through your design virtually. Does the layout flow naturally? Is there enough space around furniture? Do doors have clearance to open fully?
Create final renderings:
Generate high-quality images from multiple angles. Include daytime and evening views to show how lighting affects the space.
Phase 6: Documentation
Prepare deliverables:
- Multiple viewing angles of each room
- Overall floor plan with measurements
- Material and finish specifications
- Furniture and fixture lists with sources
- Construction notes for contractors
This structured approach with a reliable floor plan design maker ensures nothing gets overlooked and results in comprehensive, professional documentation.
Also, Read: High-Quality Floor Plans at Unbeatable Prices: Affordable Excellence
Essential Elements of Effective 3D Floor Plan Design
These 3D floor plan designs can show the exact look of the property so that buyers can have an exact idea about what they are going to buy. Successful 3D layout design incorporates specific elements that make spaces both functional and visually appealing.
Room Layout and Traffic Patterns
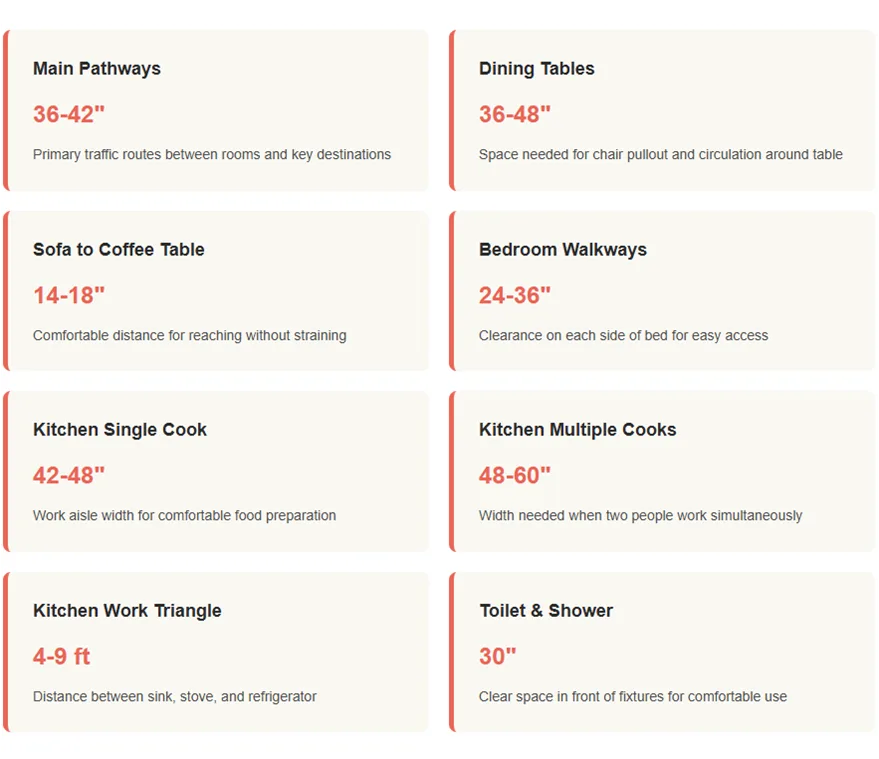
Primary pathways should be obvious and unobstructed:
People naturally follow the path of least resistance. Your design should accommodate this by creating clear routes between frequently used areas.
- Living room to kitchen: 36-42 inches of clearance
- Bedroom to bathroom: Direct, private access preferred
- Front entrance to main living areas: Welcoming, intuitive path
- Kitchen work triangle: Sink, stove, and refrigerator within 4-9 feet of each other
Furniture Selection and Placement
Size matters significantly in 3D floor design:
Oversized furniture overwhelms small rooms. Undersized pieces look lost in large spaces. Proper scale creates visual harmony.
Key clearances to remember:
- Around dining tables: 36-48 inches for chair pullout and circulation
- In front of sofas: 14-18 inches minimum to coffee table
- Bedroom walkways: 24-36 inches on each side of the bed
- Kitchen work aisles: 42-48 inches for single cook, 48-60 for multiple cooks
Create conversation zones:
Arrange seating so people can comfortably talk without shouting across the room. Eight to ten feet is ideal for conversation distance.
Storage Integration
Built-in storage maximizes space efficiency:
- Entry closets for coats and shoes
- Kitchen pantries for food and appliances
- Bedroom closets with organized systems
- Bathroom vanities with ample storage
- Living room media consoles and bookcases
Hidden storage solutions:
Under-stair storage, window seat compartments, and ottoman storage keep clutter out of sight while maintaining clean aesthetics.
Natural Light Optimization
Window placement affects mood and energy costs:
South-facing windows provide consistent natural light throughout the day. East-facing windows offer morning sun. West-facing windows can cause afternoon heat gain.
Mirror placement amplifies light:
Strategic mirror positioning in your 3D layout design reflects natural light deeper into rooms, making spaces feel larger and brighter.
Vertical Space Utilization
Make your property listing eye-catching and outstanding by using 2D or 3D floor plans.
Don’t forget the ceiling:
Standard 8-foot ceilings feel adequate. Nine-foot ceilings feel spacious. Ten-foot or higher ceilings create dramatic impact. Your 3D floor plan designer can show these differences clearly.
Vertical storage options:
- Floor-to-ceiling bookshelves
- Tall kitchen cabinets
- Lofted storage areas
- Wall-mounted organizers
Also, Read: 3D Floor Plans for Houses | 3D House Floor Plans
Color, Texture, and Lighting in 3D Floor Plans
Visual elements transform basic layouts into emotionally engaging spaces. A skilled 3D floor plan designer leverages these tools to create atmosphere and style.
Color Psychology and Application
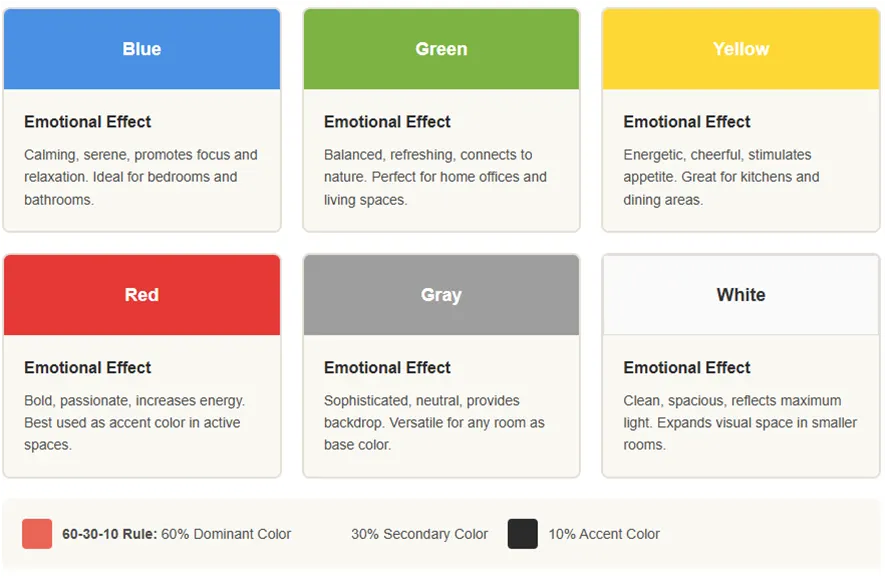
Colors evoke emotional responses:
- Blue: Calming, serene, promotes focus and relaxation
- Green: Balanced, refreshing, connects to nature
- Yellow: Energetic, cheerful, stimulates appetite
- Red: Bold, passionate, increases heart rate
- Gray: Sophisticated, neutral, provides backdrop for accents
- White: Clean, spacious, reflects maximum light
Color distribution in 3D floor design:
Apply the 60-30-10 rule. Your dominant color covers 60% of the space (usually walls). Secondary color accounts for 30% (furniture, curtains). Accent color provides 10% pop (pillows, artwork, accessories).
Room-specific color considerations:
Kitchens benefit from warm, appetite-stimulating colors like cream, soft yellow, or terra cotta. Bedrooms need restful colors like soft blue, lavender, or sage green. Home offices require focus-promoting colors like green or light gray.
Texture and Material Selection
Floor plans are considered an essential marketing tool that can make your property listing stand out from the competitors.
Texture adds depth and interest:
Flat, monochromatic spaces feel sterile. Varied textures create visual richness even within a single color palette.
Combine contrasting textures:
- Smooth leather with nubby linen
- Sleek glass with rough stone
- Polished wood with soft wool
- Glossy tile with matte paint
Flooring textures set the foundation:
Property buyers can easily check the layout and internal spaces by seeing floor plans.
Hardwood provides warmth and classic appeal. Tile offers durability and water resistance. Carpet adds comfort and sound absorption. Concrete delivers industrial edge.
Wall textures create character:
- Smooth painted drywall: Clean, modern
- Textured plaster: European, sophisticated
- Exposed brick: Industrial, urban
- Wood paneling: Rustic, cozy
- Wallpaper: Patterned, decorative
Natural and Artificial Lighting
Layered lighting creates flexibility:
Every room needs three lighting types working together.
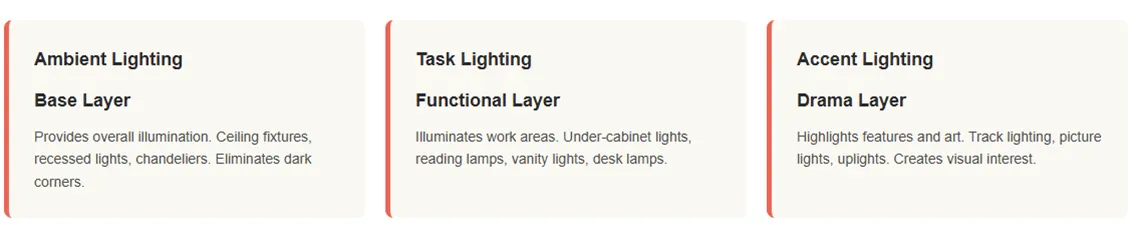
Ambient lighting:
Provides overall illumination. Ceiling fixtures, recessed lights, and chandeliers fill this role. This base layer should eliminate dark corners and provide adequate general visibility.
Task lighting:
Illuminates specific work areas. Under-cabinet kitchen lights, reading lamps, vanity lights, and desk lamps help you perform activities safely and comfortably.
Accent lighting:
Highlights architectural features or artwork. Track lighting, picture lights, and uplights create visual interest and drama.
Natural light strategies in 3D layout design:
- Skylights bring light to interior rooms
- Transom windows above doors spread light between spaces
- Light tubes channel daylight through roof structures
- Glass doors maintain openness while defining spaces
- Light-colored walls reflect and amplify available light
Smart lighting control:
Dimmer switches adjust intensity for different moods. Smart bulbs change color temperature from energizing daylight to relaxing warm white. Automated systems adjust throughout the day to match natural circadian rhythms.
Material Reflectivity
It will help them to make up their mind about the usability of space. How internal areas are connected to each other? and how they look like? how much size and areas are included? etc.
Glossy surfaces bounce light:
High-gloss paint, polished stone, metallic finishes, and mirrors amplify both natural and artificial light. Use strategically to brighten dark spaces.
Matte surfaces absorb light:
Flat paint, unglazed tile, raw wood, and fabric soften spaces and reduce glare. Balance with reflective elements for visual interest.
Also, Read: Why 3D Floor Plans Are the Game-Changer Every Real Estate Pro Needs?
Design Styles: Modern, Traditional, Minimalist
Here we can understand the real estate photos are not enough, in this case, floor plans help them to understand the internal layout more clearly. Understanding popular design styles helps you communicate your vision clearly when working with a floor plan design maker or 3D floor plan designer.
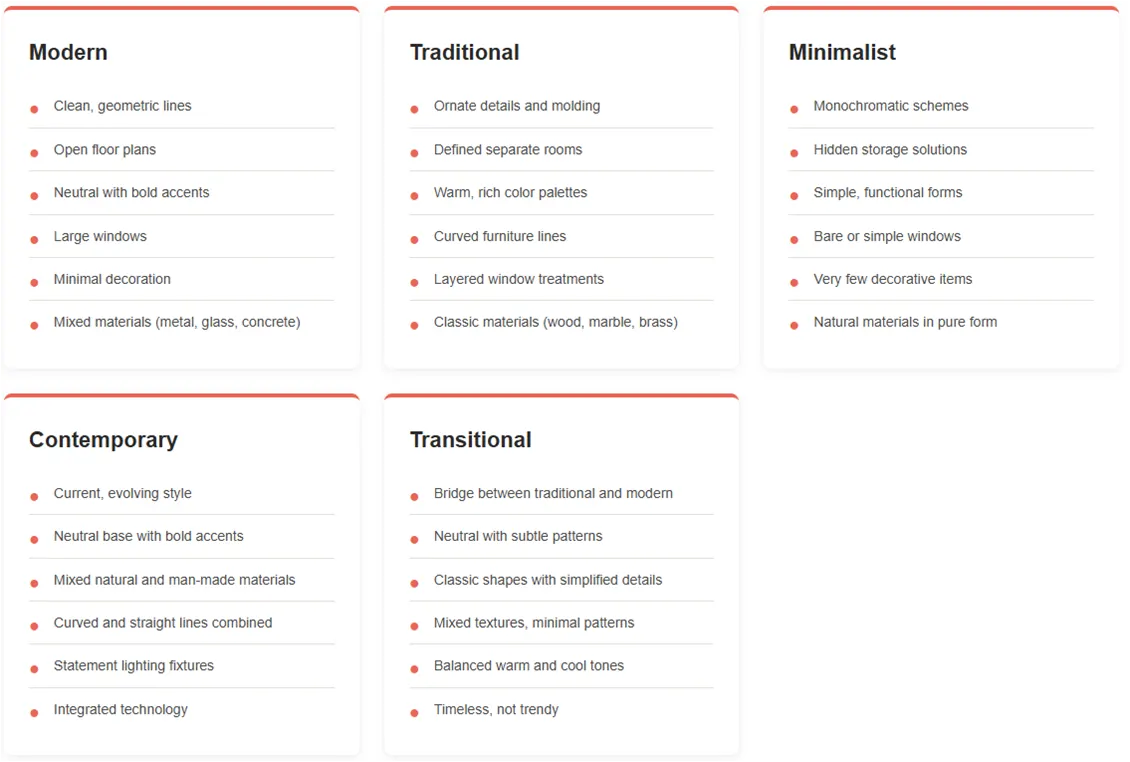
Modern Design
A recent study shows that we can increase click-throughs up to 65% by using 3D floor plan design in real estate listings. Some of you might be interested to know how these floor plans work in actuality:
Characteristics of modern 3D floor design:
Clean lines dominate modern spaces. Furniture features geometric shapes without ornate details. The aesthetic celebrates simplicity and function.
Key elements:
- Open floor plans with minimal walls
- Neutral color palettes with bold accent colors
- Large windows with minimal window treatments
- Sleek furniture with metal, glass, and molded wood
- Minimal decorative accessories
- Exposed architectural elements
- Mixed materials like concrete, steel, and glass
Modern spatial planning:
Rooms flow into each other with defined zones rather than walls. Kitchen, dining, and living areas often occupy one large space with furniture arrangement creating subtle boundaries.
Traditional Design
Creating a floor plan for Property listing purpose: You can try to draw estimated 3D floor plan design from scratch or can take professional’s help to get Floor Plans for Real Estate Agents to highlight the actual flow of the property.
Characteristics of traditional style:
Traditional design draws from European decorative arts. Spaces feel formal, symmetrical, and rich in architectural detail.
Key elements:
- Defined rooms with clear purposes
- Warm, rich color palettes with jewel tones
- Ornate molding, wainscoting, and trim
- Classic furniture with curved lines and carved details
- Layered window treatments with drapes and valances
- Traditional materials like hardwood, marble, and brass
- Decorative accessories including artwork, books, and collectibles
Traditional spatial planning:
Each room serves a specific function. Formal living rooms, separate dining rooms, and private studies create a compartmentalized layout. Hallways connect spaces and provide privacy.
Minimalist Design
The process is actually quite simple where the drag and drop tools assist in the easy drawing so that floor plans can be updated with ease.
Characteristics of minimalist 3D layout design:
“Less is more” defines minimalist philosophy. Every element serves a purpose. Clutter is eliminated. Space itself becomes a design element.
Key elements:
- Monochromatic or limited color schemes
- Hidden storage to maintain clean surfaces
- Furniture with simple, functional forms
- Bare windows or simple shades
- Smooth, unadorned walls and ceilings
- Natural materials in their purest form
- Very few decorative objects, each carefully chosen
Minimalist spatial planning:
Open layouts with multifunctional spaces work well for minimalism. A room might serve as guest bedroom, home office, and yoga studio depending on needs. Furniture often includes built-in storage or transforms for different uses.
Contemporary Design
The 3D floor plan design software tools allow you to complete the design with simple cursor movements. This software provides highly precise guidelines and dimensioning details so that buyers can find an exact idea about the whole plot.
Contemporary differs from modern:
While modern refers to a specific historical period (mid-20th century), contemporary means “current” and evolves continuously. Today’s contemporary design borrows from multiple styles.
Key elements:
- Neutral foundations with bold accent colors
- Mix of natural and man-made materials
- Curved and straight lines in harmony
- Emphasis on sustainability and eco-friendly materials
- Statement lighting fixtures as focal points
- Open shelving and display areas
- Technology integration throughout
Transitional Design
The best of both worlds:
Transitional style bridges traditional and contemporary. This popular approach creates timeless spaces that feel current but not trendy.
Key elements:
- Neutral color schemes with subtle patterns
- Classic furniture shapes with simplified details
- Mix of textures without busy patterns
- Streamlined window treatments
- Both warm and cool tones balanced carefully
- Minimal accessories but not sparse
- Updated versions of traditional materials
Choosing your style:
Your 3D floor plan designer can create renderings in different styles so you can see which resonates with you. Many people naturally gravitate toward transitional designs that blend elements from their favorite styles.
Common Design Mistakes to Avoid
Furnish and Personalize your 3D floor plan designs: Professionals can start by adding floors, ceiling materials, and walls in the area. Search for the best finishing choices and match the colors of paints as per your dream house décor. Even experienced designers occasionally make errors. Learning from common mistakes saves time and money during your 3D floor plan design process.
Scale and Proportion Errors
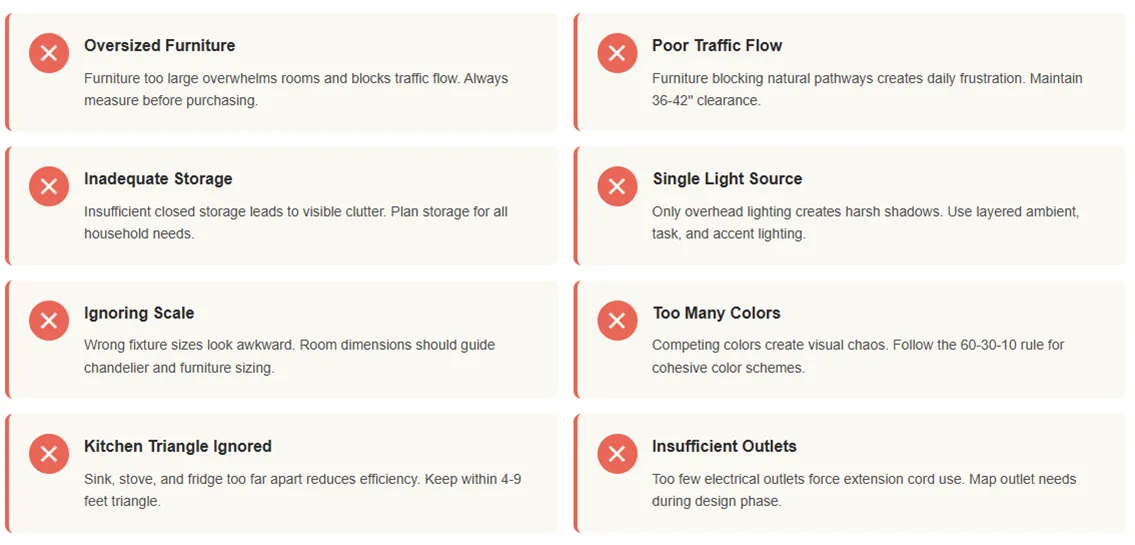
Furniture too large for the space:
That gorgeous sectional sofa looks amazing in the showroom’s massive space. In your living room, it overwhelms everything else and blocks traffic flow.
Solution: Always measure furniture dimensions and map them in your 3D layout design before purchasing. Leave adequate circulation space around each piece.
Too many small pieces:
Filling a room with numerous small furniture items creates visual clutter and makes the space feel busy and cramped.
Solution: Choose appropriately sized furniture that fits the room scale. Fewer, larger pieces often work better than many small ones.
Poor Traffic Flow
Furniture blocking natural pathways:
Placing a console table in front of the sliding door to the patio seems fine until you actually need to access the door regularly.
Solution: Identify primary traffic routes in your floor plan design maker and keep them clear. Main pathways need 36-42 inches of clearance.
Too many furniture barriers:
Having to walk around multiple obstacles to move through a room feels awkward and frustrating.
Solution: Create clear, direct paths between room entries and key destinations like seating areas.
Inadequate Storage
Furnish the area with the best set of arrangements. You can find thousands of branded products in the market that can assist you better to customize and compare different layouts. Finally update details like room names, sizes, and exact measurements.
Underestimating storage needs:
Beautiful minimalist designs sometimes sacrifice practical storage, leading to clutter accumulation with nowhere to put things.
Solution: Plan for sufficient closed storage in your 3D floor design. Every family member needs space for personal belongings, and households need storage for seasonal items, cleaning supplies, and everyday essentials.
Awkward closet locations:
Closet doors that swing into traffic areas or block other doors create daily frustration.
Solution: Consider door swing direction in your 3D floor plan designer. Sliding or bifold doors work well in tight spaces.
Lighting Mistakes
Single overhead light as only source:
Relying solely on ceiling fixtures creates harsh shadows and inflexible lighting that can’t adapt to different activities or moods.
Solution: Plan for layered lighting with ambient, task, and accent sources controlled independently.
Insufficient natural light:
Dark, windowless rooms feel depressing and require artificial lighting all day, increasing energy costs.
Solution: Maximize natural light with adequate window sizing and strategic placement. Consider skylights or light tubes for interior spaces.
Wrong fixture scale:
A tiny pendant light over a large dining table looks out of place. An oversized chandelier in a small entryway overwhelms the space.
Solution: Use this rule for dining room chandeliers: room length plus room width in feet equals fixture diameter in inches. (Example: 12-foot by 14-foot room needs approximately 26-inch diameter fixture.)
Color and Material Mistakes
Too many competing colors:
Using numerous bright colors without a cohesive palette creates visual chaos.
Solution: Stick to a planned color scheme with a dominant neutral, supporting secondary color, and limited accent colors.
Ignoring undertones:
Paint colors have warm or cool undertones that affect how they interact. Gray with blue undertones clashes with beige having yellow undertones.
Solution: Test paint samples in your actual space under different lighting conditions. Work with a 3D floor plan designer who can show how colors interact in your specific layout.
Clashing finishes:
Mixing too many metal finishes (brass, chrome, nickel, oil-rubbed bronze) in one room looks disorganized.
Solution: Choose two complementary metal finishes maximum per room. Use the dominant finish for larger fixtures and the accent finish sparingly.
Functional Design Oversights
Start with professional floor planning: As soon as the Floor Plans for Realtors are completed, you can print it with a high-quality 2D or 3D view.
Kitchen work triangle ignored:
Placing the refrigerator, sink, and stove too far apart or in awkward configurations makes cooking inefficient and frustrating.
Solution: Keep the three key kitchen elements within 4-9 feet of each other in a triangle formation. This classic layout remains popular because it works.
Bathroom layout problems:
Toilets visible directly from the doorway, inadequate counter space, or insufficient clearance around fixtures create daily annoyances.
Solution: Provide 30 inches of clear space in front of toilets and showers. Position toilets out of direct sight lines when possible. Plan for adequate counter space for daily routines.
Overlooking electrical needs:
Too few outlets force reliance on extension cords. Outlets in wrong locations require furniture rearrangement or create unsightly cord runs.
Solution: Map out electrical outlet locations during the 3D floor design phase. Consider where you’ll plug in lamps, charge devices, use appliances, and power electronics.
Trendy Over Timeless
Following trends without consideration:
Trendy colors, patterns, or fixtures date quickly. What looks fresh today may appear outdated in three years.
Solution: Use trendy elements as accents you can easily change (pillows, artwork, small decor items). Choose timeless finishes for expensive, permanent features like flooring and countertops.
Ignoring Acoustics
Hard surfaces everywhere:
All-hard flooring, bare walls, and minimal soft furnishings create echo chambers. Sound bounces around uncomfortably.
Solution: Balance hard and soft materials. Add area rugs, upholstered furniture, curtains, and acoustic panels to absorb sound and create comfortable noise levels.
Working with Professional 3D Floor Plan Designers
Soon you will get attractive photos to share online via your website and they can also be updated on social media pages to attract buyers from different corners of the world. Professional designers bring expertise, creativity, and efficiency to your project. Understanding how to work effectively with a 3D floor plan designer ensures the best results.
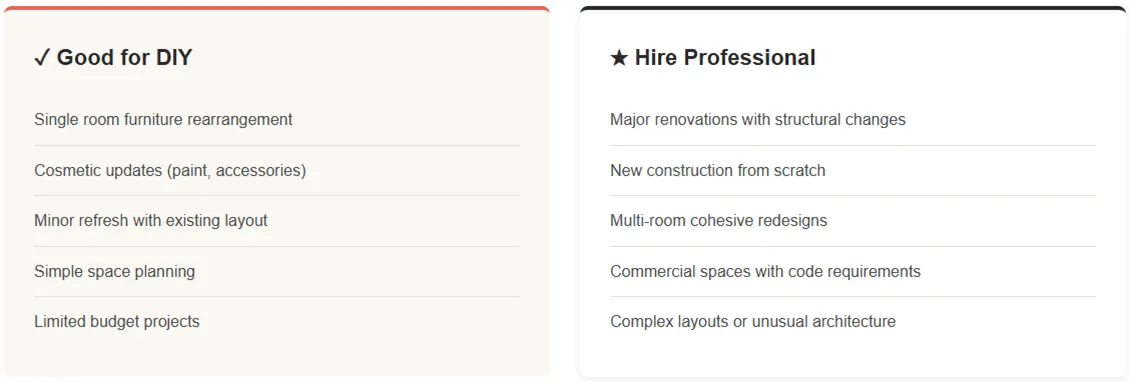
When to Hire a Professional
Complex projects benefit from professional help:
- Major renovations involving structural changes
- New construction from scratch
- Multi-room redesigns requiring cohesive flow
- Commercial spaces with specific code requirements
- Homes with challenging layouts or unusual architecture
- Projects with strict budgets requiring strategic planning
Simple projects you might handle independently:
- Single-room furniture rearrangement
- Cosmetic updates like painting and new accessories
- Minor refresh with existing layout intact
Finding the Right Designer
Research thoroughly:
Look for designers with experience in your project type. Residential designers specialize differently than commercial designers. Some focus on specific styles or room types.
Review portfolios carefully:
Past work reveals design aesthetic, attention to detail, and technical capability. Do their previous projects resonate with your vision?
Check credentials:
Professional certifications demonstrate commitment and expertise:
- NCIDQ (National Council for Interior Design Qualification)
- ASID (American Society of Interior Designers)
- IIDA (International Interior Design Association)
Read reviews and testimonials:
Previous clients provide insight into communication style, reliability, budget management, and overall satisfaction.
Interview multiple candidates:
Chemistry matters when working closely with a designer. Interview at least three candidates before deciding.
Questions to Ask Potential Designers
It is good to use professional tricks to present your designs in the market. 3D Floor Plan Designs for Real Estate Photography ensure a great deal. The attractive photography of property improves its value in the market and attracts numbers of buyers.
About their process:
- How do you approach new projects?
- What information do you need from me to start?
- How many revision rounds are included?
- What deliverables will I receive?
About their experience:
- How long have you been designing 3D floor plans?
- What software do you use for 3D layout design?
- Have you worked on projects similar to mine?
- Can you share references from recent clients?
About project specifics:
- What is your estimated timeline?
- What are your fees, and what do they include?
- Do you help with implementation and contractor coordination?
- How do you handle unexpected issues or changes?
About communication:
- How often will we have check-ins?
- What’s the best way to reach you with questions?
- How do you incorporate my feedback?
Understanding Designer Fees
Pricing structures vary:
Hourly rates: Pay for time spent designing. Rates typically range from $50-$250 per hour depending on experience and location.
Flat project fees: One price covers the entire project scope. Provides cost certainty but requires clear scope definition upfront.
Per square foot: Common for residential projects. Rates vary based on project complexity and finishes level.
Percentage of construction cost: Some designers charge 10-15% of total construction budget.
What’s included in design fees:
- Initial consultation and site measurement
- Concept development and preliminary designs
- 3D floor plan design and renderings
- Material and finish selections
- Furniture specifications and sourcing
- Contractor documentation
Additional services often cost extra:
- Construction administration and site visits
- Purchasing and receiving furniture and materials
- Styling and installation
- Revisions beyond agreed scope
Preparing for Your First Meeting
Bring organized information:
- Current floor plans or measurements if available
- Photos of the existing space
- Inspiration images showing styles you like
- List of must-have features and requirements
- Realistic budget range
- Timeline expectations
Be clear about priorities:
What matters most? Maximizing storage? Creating entertaining space? Improving natural light? Accessibility features? Help your 3D floor plan designer understand what success looks like for you.
Discuss lifestyle needs:
- Who lives in the space (kids, pets, elderly relatives)?
- How do you actually use different rooms?
- What activities happen in each space?
- What frustrates you about your current layout?
- What do you love that should be preserved?
Collaborating Effectively
3D Floor Plan Designs for Real Estate Photographers: This is a great option for sellers as well as buyers because it assists in easy deals.
Provide honest feedback:
Your designer creates solutions for your needs, not their own preferences. If something doesn’t feel right, speak up immediately.
Be specific about concerns:
Instead of “I don’t like it,” try “The color feels too dark for me” or “This furniture layout doesn’t leave enough room for my piano.”
Trust expertise while advocating for yourself:
Designers bring professional knowledge about what works functionally and aesthetically. Listen to their reasoning. But if something truly doesn’t fit your needs or style, don’t feel pressured to accept it.
Respond to communications promptly:
Delayed responses to questions about preferences or approvals cause project delays. Check emails regularly and provide requested information quickly.
Understand the revision process:
Most designers include a specific number of revision rounds. Providing clear, consolidated feedback in each round prevents excessive back-and-forth and keeps projects on schedule.
Also, Read: 3D Floor Plan Price/ Cost Details | Unbeatable Lowest Pricing
Using Floor Plan Design Maker Software
Professional designers use specialized software:
Popular 3D floor design applications include:
- AutoCAD: Industry-standard for technical drawings
- SketchUp: Intuitive 3D modeling with extensive object libraries
- Chief Architect: Comprehensive home design software
- Revit: Building information modeling for complex projects
- 3ds Max: Advanced rendering for photorealistic images
DIY floor plan design makers:
If hiring a professional isn’t in your budget, several user-friendly tools let you create basic 3D layout designs yourself:
- RoomSketcher: Drag-and-drop interface with furniture libraries
- Planner 5D: Free online tool with realistic rendering
- HomeByMe: Extensive catalog and sharing features
- Floorplanner: Straightforward floor plan creation
- IKEA Home Planner: Great for planning with IKEA furniture
Software capabilities to look for:
- Accurate measurement tools
- Extensive furniture and fixture libraries
- Material and color customization
- Multiple viewing angles
- Photo-realistic rendering
- Export options for sharing with contractors
Implementation and Project Management
As sellers find it much easier to highlight the essential feature of their property using 2D and 3D floor plans and further, buyers can avail complete information even from images about what they are going to buy. This is definitely a great idea to boost the real estate market.
Designer involvement during construction:
Some designers offer construction administration services. They review contractor work, answer questions, solve problems, and ensure design intent is followed.
Furniture procurement assistance:
Designers often help order furniture, track deliveries, and coordinate installation. Their industry connections may provide trade discounts that offset their fees.
Final styling:
Many designers offer installation services where they arrange furniture, hang artwork, style shelves, and add finishing touches that bring the design together.
Also, Read: Creating Floor Plan Illustrations using Adobe Illustrator
Getting Maximum Value
Be prepared and organized:
The more efficiently you can provide information and make decisions, the more design time your budget buys.
Prioritize spending:
Discuss where to invest in quality and where budget-friendly options work fine. Designers can guide you toward the best value for your specific situation.
Think long-term:
A well-designed 3D floor plan creates lasting value. Invest in getting the layout right initially rather than making costly changes later.
Learn from the process:
Pay attention to design principles and decision-making processes your designer demonstrates. This knowledge serves you in future projects and helps you maintain the designed space.
Also, Read: How Floor Plans are Important for Real Estate Agents?
Key takeaways (in Short)
We have discussed all the aspects of 3D floor plan designs, definition, uses, benefits, advantages, how to create it? 3D floor plan design bridges imagination and reality. What starts as vague ideas about “more space” or “better flow” transforms into detailed, tangible plans you can see, understand, and build.
Whether you tackle the design yourself with a floor plan design maker or collaborate with a professional 3D floor plan designer, the process follows similar principles. Understand your needs, explore possibilities, refine details, and create comprehensive documentation.
The investment in quality 3D floor design pays dividends. You avoid costly construction mistakes. You make confident decisions about expensive finishes and fixtures. You create spaces that function beautifully for years to come.
Your home or commercial space shapes daily experiences. Thoughtful 3D layout design ensures those experiences are positive, comfortable, and inspiring.
Ready to start your design journey? Take measurements, gather inspiration, define your goals, and begin transforming your space from concept to completion. Here you can reach out to our 3D floor plan services.